What if a few simple Dollar Tree finds could become an elegant wedding centerpiece? In this video, I turn inexpensive glass pieces into polished table décor that can work for a wedding, shower, anniversary dinner, or upscale celebration. The finished design looks refined, but the build stays approachable for beginners.
Watch the full video above first, then use the breakdown below as your written build guide.
Project at a Glance
- Skill level: Beginner
- Active build time: About 15–25 minutes, plus adhesive curing time if pieces are permanently joined
- Best for: Weddings, bridal showers, engagement dinners, anniversaries, and elegant home entertaining
- Suggested footprint: Keep each arrangement within approximately 10–14 inches so place settings and serving pieces still fit comfortably
- Suggested height: Keep the finished design below seated eye level unless the center is narrow enough to preserve sightlines
- Look: Clear glass, reflected candlelight, and a clean luxury silhouette
Budget note: The “$5” in the video title reflects the original Dollar Tree concept. Store inventory and prices change, and optional candles, florals, adhesive, trays, and finishing details will affect your total. Always price the complete design before producing multiples.
Supplies and Useful Amazon Alternatives
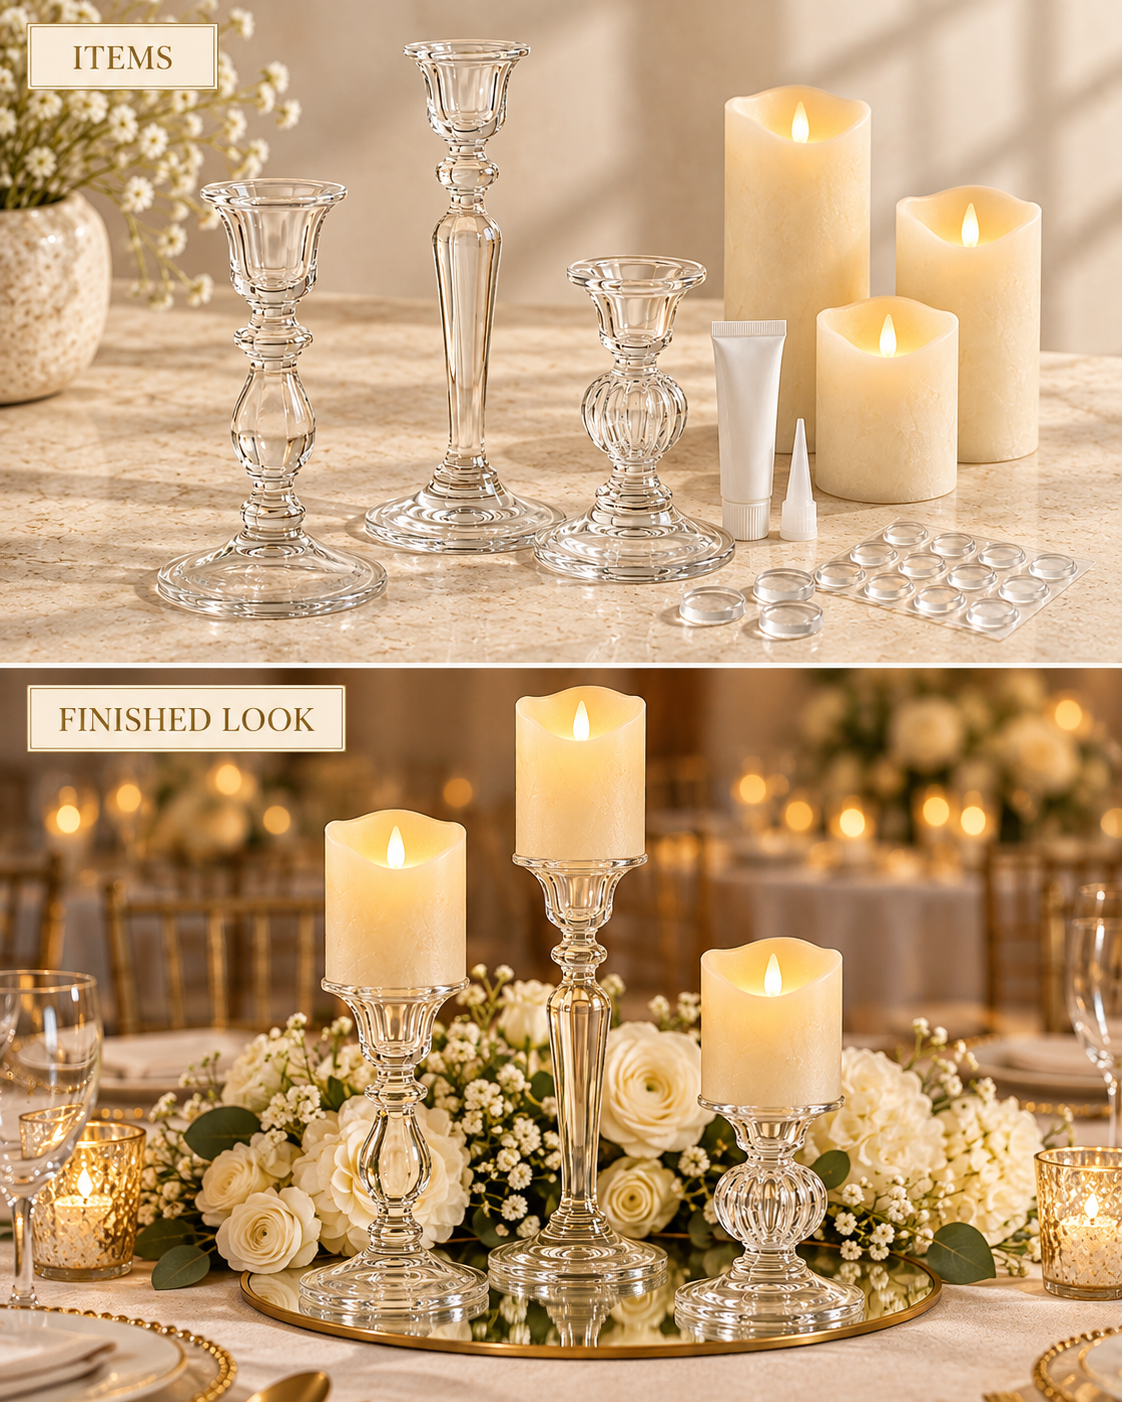
Visual cue: Before shopping, pause the video on the supply view and compare the shape and scale of each glass piece. Amazon links below are convenient equivalents or backups; exact Dollar Tree inventory may differ.
Affiliate disclosure: Some links below are affiliate links. If you purchase through them, Elegant Creators may earn a commission at no additional cost to you. As an Amazon Associate I earn from qualifying purchases.
Clear Glass Candleholders
Choose matching clear glass pieces with flat, stable contact points. Similar shapes help the finished grouping look intentional.
Clear Glass-and-Ceramic Adhesive
Use only if the video version you are recreating requires pieces to be permanently joined. Confirm that the product is rated for glass and allow the full cure time.
Warm-White Flameless Candles
Flameless candles give the centerpiece a warm glow without open flame, wax drips, or smoke—especially useful where venue rules prohibit real candles.
Clear Nonslip Bumpers
Small clear bumpers can reduce sliding and help protect delicate tables, mirrors, and rented linens without distracting from the glass design.
Complete Materials List
- Clear glass candleholders or small glass vessels in the shapes shown in the video
- Warm-white flameless candles sized safely for the holders
- Clear glass-safe adhesive, only when permanent assembly is desired
- Isopropyl alcohol or glass cleaner and a lint-free cloth
- Painter’s tape for temporary alignment marks
- Clear nonslip bumpers or a protective base
- Optional mirrored tray, low florals, scattered crystals, ribbon, or pearl accents
- Nitrile gloves and a disposable work-surface cover
Video Breakdown: From Dollar-Store Glass to Elegant Centerpiece
Part 1: See the Finished Look
The video opens by showing the transformation you are working toward. Notice the clean symmetry, transparent glass, and how the candlelight becomes the main decorative feature. This first look is your styling reference: keep the finished piece polished rather than overcrowded.
Part 2: Gather and Inspect the Glass Pieces
Lay out every piece before assembling anything. Check for chips, hairline cracks, rocking bases, or uneven rims. Set damaged glass aside. For multiples, sort pieces by height and width so every guest table has a consistent silhouette.
Part 3: Clean the Contact Surfaces
Remove stickers and residue, then clean and dry the glass thoroughly. Fingerprints, dust, and adhesive residue are especially visible on a clear centerpiece. If you plan to glue pieces, the contact surfaces must be completely dry and free of oil.
Part 4: Test the Arrangement Before Joining Anything
Dry-fit the pieces in the same order shown in the video. Center each connection and view it from every side. Use small pieces of painter’s tape as alignment guides. Press lightly on the tabletop near the arrangement; if it rocks or shifts, adjust the pairing before moving forward.
Part 5: Secure the Structure
If the design is intended to be permanent, apply a thin, controlled amount of glass-safe adhesive at each contact point. Too much glue can squeeze out and remain visible. Recheck alignment immediately, then leave the piece undisturbed for the manufacturer’s full cure time. Do not confuse “dry to the touch” with fully cured.
Part 6: Add the Candlelight
Once the structure is stable, add appropriately sized flameless candles. Warm-white light generally photographs more elegantly than cool blue-white LEDs. Test every candle before transporting the centerpiece and carry spare batteries or backup candles.
Part 7: Style the Table Without Hiding the DIY
Give the centerpiece breathing room. A mirrored tray can amplify the light; a few low florals can soften the glass; and a narrow runner can connect the arrangement to the rest of the tablescape. Keep embellishments below the candle opening and away from any heat source.
Part 8: Make the Final Reveal Event-Ready
Finish by cleaning the outside of the glass one more time. View the design from seated height, photograph it with the table fully set, and confirm that guests can see one another. Repeat the same spacing and styling formula for every table.
How to Make It Look More Expensive
- Repeat one glass shape. Consistency creates a stronger designer look than many unrelated pieces.
- Use warm light. A uniform candle color makes inexpensive glass feel intentional.
- Limit embellishments. Choose one accent—mirror, pearls, ribbon, or low florals—not all of them.
- Style in odd-numbered groups. A trio at varied heights often looks fuller while keeping the arrangement balanced.
- Polish every surface. Clear glass exposes fingerprints, dust, glue strings, and water spots.
Optional Upgrades
- Place the grouping on a beveled mirrored tray.
- Add a low ring of ivory florals that does not cover the glasswork.
- Use ribbon in the wedding palette around a removable insert rather than gluing it to the glass.
- Add subtle crystal or pearl details at the base.
- Create mixed heights while keeping the same candle and glass style.
Safety and Venue Protection
- Use flameless candles unless the venue has approved open flame in writing.
- Never use chipped, cracked, or unstable glass.
- Do not transport tall assembled glass designs loose in a vehicle. Use divided, padded crates.
- Follow the adhesive manufacturer’s ventilation, handling, and curing instructions.
- Use clear bumpers, felt, or a venue-approved protective barrier beneath the design.
- Keep the centerpiece away from table edges, crowded serving zones, and children’s reach.
- Test the completed structure before placing it in a guest area.
Troubleshooting
The pieces look crooked
Separate them before the adhesive sets, clean the joint, and dry-fit again using tape guides. Rotate each piece until the flattest contact points meet.
The adhesive is visible
Use less product and keep it within the contact area. Follow the manufacturer’s removal directions; do not scrape cured adhesive aggressively from delicate glass.
The centerpiece slides on the table
Add clear nonslip bumpers or place the grouping on a stable tray with a protected underside.
The design looks inexpensive
Remove extra embellishments, match the candle color, clean the glass, and repeat a consistent shape. Simple repetition usually looks more luxurious than adding more decoration.
The centerpiece blocks conversation
Lower the tallest element or reduce the width through the guests’ sightline. Always test from a seated chair before the event.
Frequently Asked Questions
Do I have to glue the glass pieces?
No. If the design is stable as separate pieces, keeping it modular may make transport and storage easier. Glue only when the structure requires a permanent bond.
Can I use real candles?
Only with written venue approval and glassware rated for the intended candle. Flameless candles are the safer, lower-maintenance choice for most events.
How many centerpieces should I make?
Make one per guest table, plus at least one tested backup component set. Also plan separate designs for focal tables if their dimensions differ.
How do I price this for a client?
Include every material, replacement allowance, design labor, assembly time, packing supplies, delivery, setup, teardown, cleaning, storage, and profit. Do not price from the Dollar Tree receipt alone.
Final Checklist
- All glass is chip-free, clean, and dry
- Every joint is centered and fully cured
- The base is level, nonslip, and surface-safe
- Flameless candles work and backup batteries are packed
- The finished height preserves guest sightlines
- The venue’s candle and décor rules are confirmed
- Each piece is packed upright in a padded, labeled container
- A final table photo has been taken for consistent replication
Price the Entire Setup—Not Just the Supplies
Creating this for a client? Use the Elegant Creators calculator to account for materials, labor, delivery, setup, overhead, and profit before sending your quote.
Join the conversation
What do you think?
Share your thoughts, questions or experience with this design. We would love to hear from you.