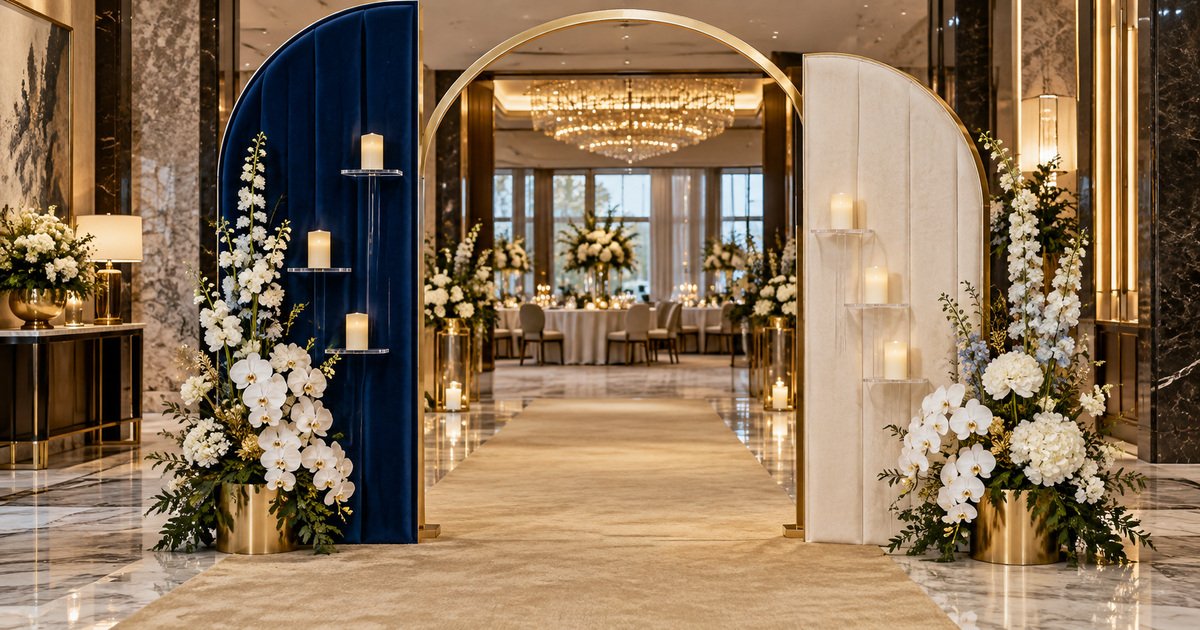
A wedding entrance should announce the celebration before guests reach the reception room. This freestanding sapphire-and-ivory welcome installation creates that high-impact moment with reusable arch frames, fitted covers, clear candle shelves, a central sign, and restrained florals—without balloons or permanent venue attachments.
Project overview
Finished footprint: approximately 10–12 feet wide, 7–8 feet high, and 24–30 inches deep
Build time: 3–4 hours off-site plus 90–150 minutes on-site
Team: two installers; three for a tight load-in
Skill level: intermediate
Best for: hotel foyers, ballroom entrances, estate halls, and covered venue vestibules
Confirm the ceiling height, fire exits, guest traffic, load-in route, and venue attachment rules before ordering materials. The center opening should remain at least 6 feet wide unless the venue requires more.
Supplies
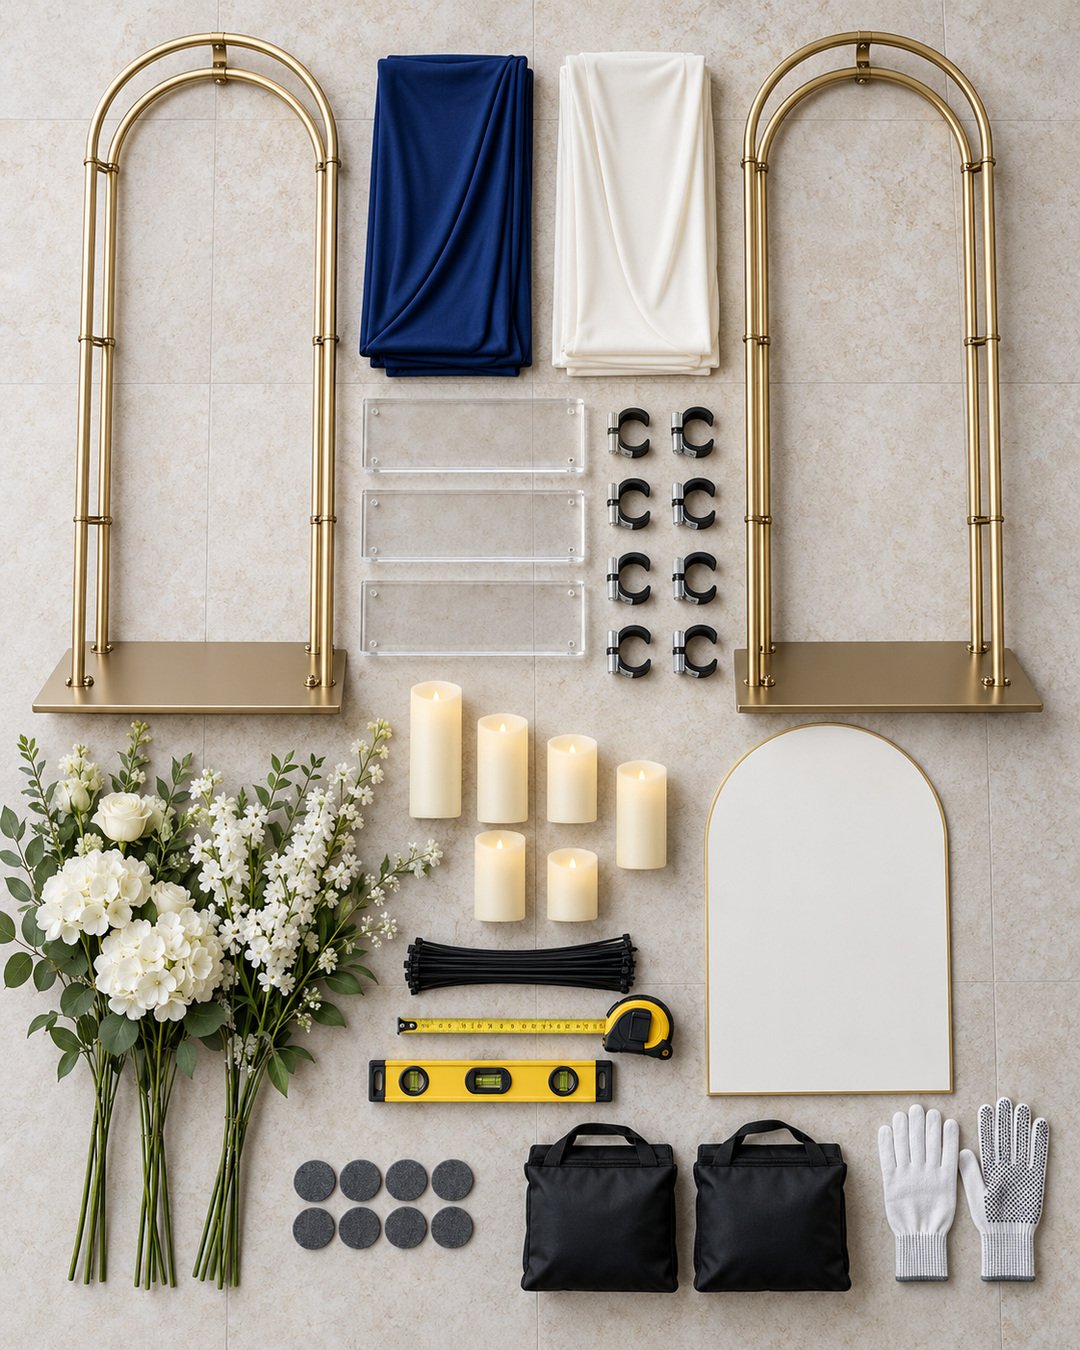
This section contains affiliate links. As an Amazon Associate I earn from qualifying purchases.
STRUCTURE
Freestanding Gold Arch Backdrop Frames
Choose frames with wide steel base plates and enough height for a guest-facing entrance. Two frames create the layered asymmetric look.
COLOR & FINISH
Sapphire and Ivory Backdrop Covers or Draping
Fitted stretch covers give a tailored finish; flame-retardant drape adds softness when the venue permits it.
DISPLAY
Clear Acrylic Shelves and Secure Clamps
Use shelves designed for the frame diameter and rated for the combined candle weight. Mechanical clamps are safer than adhesive.
LIGHTING
Warm-White Flameless Pillar Candles
Remote-controlled wax or resin candles provide a consistent glow without open-flame risk near fabric and flowers.
Remaining supply list
- Two arch frames, hardware, and manufacturer tools
- Four to six concealed base weights or sandbags
- Felt or rubber pads for every point touching the floor
- One central acrylic, mirror, or printed welcome sign with its own stable stand
- Six to ten flameless candles in staggered heights
- Six clear shelves with compatible clamps
- Flame-retardant fitted covers or finished fabric
- Reusable floral cages, cable ties, safety wire, and realistic faux or conditioned fresh florals
- Level, tape measure, gloves, scissors, steamer, lint roller, and repair kit
Build the structure before decorating

- Mark the footprint. Tape the outside corners on a practice floor, preserving a minimum 6-foot center opening and the venue’s required exit clearance.
- Assemble and pad the frames. Tighten all manufacturer hardware, place protective pads beneath base plates, and test for rocking.
- Add concealed weight. Place weight directly over or against each base according to the frame design; never hang weight from the top.
- Fit the covers. Steam fabric away from the frame, then pull it evenly so seams sit on the back or inside edge.
- Clamp the shelves. Use a level. Keep the lowest shelf above knee height and every shelf within the frame silhouette so guests cannot catch it.
- Test the display load. Add the heaviest planned candle to each shelf for 15 minutes and gently bump-test the frame before styling.
- Position the sign. Give a freestanding sign its own stable base rather than leaning it against the arches.
- Add florals and light. Secure floral cages to structural points, conceal mechanics, and switch on flameless candles only after the installation is stable.
Finish, inspect, and photograph

Stand at the guest approach and remove anything that blocks the sign. Match all candle color temperatures, hide every cable tie, and keep florals concentrated at the upper outside corners and base so the central opening remains visually clean.
Optional upgrades
- Add pin-spot lighting from the venue rather than attaching powered lights to the frame.
- Replace faux florals with professionally hydrated fresh floral cages.
- Add a removable monogram to the central sign.
- Use one mirrored plinth outside the traffic path for programs or favors.
- Repurpose the arches behind the sweetheart table after cocktail hour.
Budget guidance
Lean version: rent the frames, use fitted covers, three shelves, flameless candles, and two concentrated floral moments. Reusable version: purchase frames and covers only if they suit several future color palettes. Elevated version: add professional florals, custom signage, and venue lighting. Compare rental, delivery, storage, labor, and future reuse rather than choosing by purchase price alone.
Safety and venue protection
Obtain venue approval for the finished footprint and materials. Keep exits, door swings, fire equipment, and accessible paths clear. Use only flameless candles near fabric. Pad the floor, weight each frame independently, cover sharp hardware, keep water in sealed mechanics, and do not attach anything to walls or ceilings without written permission. Outdoor or breezeway use requires an engineered wind plan; move the installation indoors if conditions exceed the frame rating.
Troubleshooting
- The arches lean: stop decorating, loosen fabric tension, level the bases, retighten hardware, and add correctly placed weight.
- The covers look wrinkled: steam off the structure, refit from the top center, and pull evenly toward both base corners.
- The shelves rotate: remove the candles and replace or tighten the correct-size clamp; never use tape as structural support.
- The entrance feels crowded: remove one shelf tier or floral cluster and widen the center opening.
- The colors feel disconnected: repeat sapphire once at the sign or reception area and keep all metal in one warm-gold family.
Frequently asked questions
Can one person install this?
No. A two-person team is the practical minimum for lifting, leveling, and dressing tall freestanding frames safely.
Can real candles be used?
Flameless candles are the safer choice and are required near fabric. Follow the venue and fire marshal rules even when a candle is enclosed.
How do I transport the covered arches?
Transport frames disassembled unless the manufacturer permits otherwise. Bag clean covers separately, protect acrylic shelves with paper and foam, and label hardware by frame.
Can this move after the ceremony?
Yes, but remove candles, shelves, signage, and loose florals before moving the weighted frames. Assign a route and team before guests arrive.
Final finishing checklist
- Venue-approved footprint and clear center opening
- All hardware tight; frames level and independently weighted
- Floor pads installed and base weights concealed
- Shelves level, load-tested, and inside the frame outline
- Only flameless candles used near fabric
- Sign stable and readable from the guest approach
- Florals secured; mechanics hidden
- Relocation and teardown teams assigned
Price Your Next Installation With Confidence
Turn materials, labor, delivery, setup, teardown, and profit into a clear client price with the Elegant Creators Event Décor Calculator.
Join the conversation
What do you think?
Share your thoughts, questions or experience with this design. We would love to hear from you.